Taking Shots Of Stone Slabs
No doubt that a good presentation of the product you sell is half of the success. Especially in stone business, where catalogues and photo galleries are extremely useful.
You have always wanted your slabs had a presentable look on the photos you make, but the trouble lied within its shiny, reflective surface?
Was it a hard thing to do because the sunlight or a photo flash of your camera made patches? Luckily, there is a way out. We can give some advice that can make for better pictures and a smoother shoot.
Here are some tips for you to take into account. They won't require any special skills, a lot of time or purchases.
- Clean the slabs thoroughly. Because you will be using an intense flash to illuminate your countertops, grime that may be invisible under normal light may become visible.
- Select a wide angle lens. Lenses wider than 28mm are best and give a fuller view of the stone slabs.
- Use a tripod. You will be using a slower shutter speed, so a tripod will help steady your shot and reduce camera shake.
- Pay close attention to the direction that you're lighting the subject from. Try lighting from the side. Besides, photograph the stone slabs from different angles and at different distances. This will give you a body of photographs to choose from so that you can select the best one.
- Select Manual or Aperture Priority mode on your camera. You will want a smaller aperture f/8 or higher to avoid any blurring caused by depth of field. Your shutter speed should be as slow as necessary to properly expose the shot.
Although these tips may help in some situations, you may still not receive the desired result.
The most conventional ways to solve troubles with light are the ones we describe next. At first, we tell about the one which will be a bit expensive but will give an easy solution for your troubles:
If your camera has the ability to use filters, one of the most useful ones to consider purchasing is a polarizing filter. It looks a lot like a lens from sunglasses. A lot can be said about the technicalities of how they work but to keep this post brief lets go straight to the benefits of using one. Polarising filters change the way that your camera sees and treats light. As a result – one of the effects is avoiding undesirable white marks on your products' images.
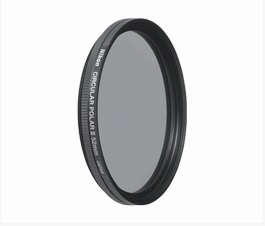

These filters are easy to use. Most of you will use a circular polarizing filter which allows you to adjust how it impacts your shots but simply rotating the front element of the filter. As you do this you’ll notice that colours and reflections in your shot change. Once you’ve got it to a point that you like simply take the shot. For the greatest impact try to keep the sun at 90° to you (i.e. to your side – not at your back and not shooting into the sun). This will help your polarizer to have the greatest effect. Be aware that shooting in low light, overcast days or at night with a polarizer is not advisable – it’s like wearing sunglasses indoors and will cut down the amount of light getting through to your image sensor.
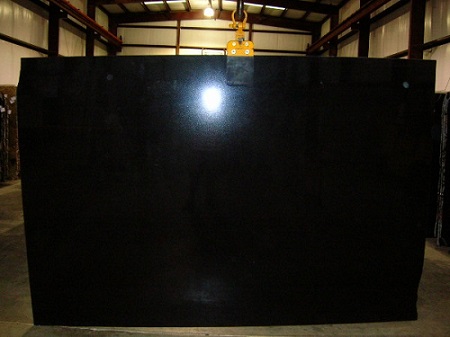
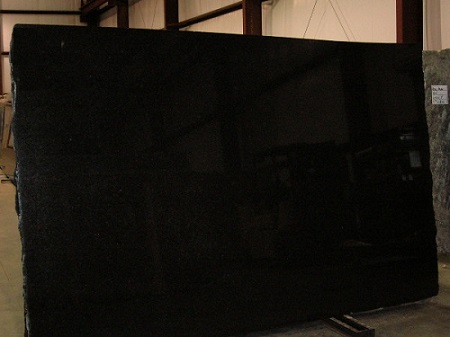
The difference can be noticed at once in this pictures:
1 - A polarizing filter not used
2 - A polarizing filter used
This is the most expensive and time requiring way out, but having chosen it you will receive the best result.
The most practical fix is to take control of the environment. Arrange some king of a studio with black or dark background, set light stands and make or order a special frame which serves as a stand to hold the slab while a picture is taken and a digital slab is created.